Sovol SV07 Series - Klipper Remote Access and AI

Introduction
Welcome to the world of Sovol 3D printing and the exciting Sovol SV07 Series. In this comprehensive guide, we will introduce you to the Sovol SV07 Series, take you on a journey to meet the Sovol SV07, and explore the remarkable Sovol SV07 Plus. But that's not all; we'll also delve into the incredible power of remote access and AI monitoring features using Obico and how to link your printer with it.

Introducing the Sovol SV07 Series
The Sovol SV07 Series represents the pinnacle of 3D printing technology. These printers are designed to cater to the needs of both beginners and experts in the world of 3D printing. With their advanced features and innovative capabilities, Sovol SV07 Series printers offer an exceptional 3D printing experience.
Meet the Sovol SV07
The Sovol SV07 is a standout 3D printer in the SV07 Series. It boasts impressive features, including a generous print bed size of 220mm x 220mm x 250mm, a high-flow hot end, and an all-metal direct-drive extruder with planetary gearing. Sovol SV07 is engineered for precision, speed, and reliability.

For additional technical information and to buy the printer, simply visit the official website through this link.
Explore the Sovol SV07 Plus
But that's not all! The Sovol SV07 Plus takes things to the next level. With a larger build volume of 300mm x 300mm x 350mm, it opens up exciting possibilities for larger and more intricate 3D prints. Both Sovol SV07 and SV07 Plus share remarkable features, such as fast printing speeds and advanced cooling systems.

To learn more and purchase the printer, just visit the official website using this link.
The Power of Remote Access and AI
Now, let's talk about something truly revolutionary. Sovol SV07 Series printers work seamlessly with Klipper software. What does this mean for you? It means you can link your printer to Obico, unlocking the potential for remote access and AI monitoring features.
With remote access, you can control and monitor your 3D printer from anywhere in the world. Whether you're at home, in the office, or on the go, you have the power to manage your prints with ease.
AI monitoring takes your 3D printing experience to the next level. Obico's AI capabilities allow you to keep a close eye on your prints, making sure everything is running smoothly. It can detect and alert you to potential issues, ensuring that your prints turn out flawlessly.
Why You Need Remote Access
In today's fast-paced world, efficiency is key, and that includes your 3D printing endeavors. Here are three compelling reasons why remote access to your Sovol SV07 Series 3D Printer can greatly benefit you:
Streamlining Your 3D Printing Workflow:
- Remote access allows you to initiate, monitor, and manage your 3D printing tasks from virtually anywhere. Whether you're at home, in the office, or on the go, you can start or pause a print, adjust settings, and even schedule print jobs remotely. This means you can optimize your printing schedule and make the most of your precious time.
The Benefits of Monitoring and Control Anywhere:
- With remote access, you gain real-time insights into your print progress. Keep an eye on your prints through live camera feeds and access crucial information such as print status, temperature, and filament usage from the convenience of your smartphone, tablet, or computer. This level of control empowers you to ensure the success of your prints, even when you're miles away.
Troubleshooting Made Easy with Remote Access:
- Sometimes, unexpected issues can arise during a 3D printing job. Remote access provides you with the tools to address these challenges promptly. You can adjust settings, pause or cancel prints, or even diagnose and resolve problems remotely. This capability minimizes downtime and reduces the frustration of encountering print failures.
Installing Obico for Klipper on Sovol SV07 Series
If you own a Sovol SV07 Series 3D printer and wish to unlock remote access and AI features by installing Obico for Klipper, follow these straightforward steps:
Step-by-Step Installation Guide
Step 1: SSH into Your Printer's Board
To start, establish a secure connection with your printer's internal computer via SSH:
Open a Terminal or Command Prompt on Your Computer – think of this as the doorway to your printer's computer.
Type the Following Command and Press Enter:
ssh mks@your-printer-ip-address
Replace your-printer-IP-address with the actual IP address of your Sovol SV07 Series printer. You can find this information in the Advance Settings on your printer's display screen.
Enter Your Credentials:
- Username:
mks - Password:
makerbase
This is similar to logging into your printer's computer system.
Step 2: Clone the Obico for Klipper Repository
Now, let's proceed to the next step:
Navigate to Your Home Directory:
In the terminal where you've connected to your printer's board, you are now within your printer's computer system. Get to your home directory with this command:
cd ~
Think of it as accessing your computer's "home" folder.
Clone the Obico for Klipper Repository:
Next, bring in the Obico for Klipper software from GitHub. Enter this command:
git clone https://github.com/TheSpaghettiDetective/moonraker-obico.git
This is akin to downloading a program to your computer.
With this, you've successfully cloned the Obico for Klipper repository onto your printer's computer, setting the stage for the installation.
Step 3: Change Directory to the Obico Repository
Let's move on to the next step:
Enter the Newly Cloned Repository:
To work with the Obico for Klipper files you've just downloaded, navigate into the repository folder. Do this with the following command:
cd moonraker-obicoThink of it as opening a folder on your computer.
Now, you're inside the Obico for Klipper repository and ready to proceed with the installation.
Step 4: Run the Installation Script
You're almost there! Let's move on to the next step:
Execute the Installation Script:
To install Obico for Klipper, run a special script by entering the following command and pressing Enter:
./install.sh
This script will configure Obico for Klipper on your printer's computer.
Obico for Klipper is now being installed on your Sovol SV07 Series printer. Please follow the on-screen prompts for the next steps in the installation process.
Step 5: Follow Installation Prompts
Let's continue with the next step, where you'll provide specific configurations:
While the installation script is running, it will prompt you for specific settings. Here's what to enter when prompted:
Moonraker Host: When asked for the Moonraker host, type in:
127.0.0.1
This informs Obico where to find the Moonraker software.
Moonraker Port: When prompted for the Moonraker port, enter:
7125
This sets the communication port for Moonraker.
Moonraker Config File: You'll be asked to specify the path to your Moonraker configuration file. Usually, it's located at:
/home/mks/klipper_config/moonraker.conf
Ensure you enter the correct path to your configuration file.
Klipper Log Directory: When asked for the Klipper log directory, provide the path to your Klipper log files, typically found at:
/home/mks/klipper_logsThis helps Obico locate the Klipper logs.
By providing these settings, you're assisting Obico for Klipper in effective communication with your Sovol SV07 Series printer's software. Continue to follow the installation prompts as needed.
Upon completing these steps, you'll have successfully installed Obico for Klipper on your 3D printer. To optimize this setup, follow these additional steps:
Step 1: Sign up for an Obico Account
If you haven't already, create an Obico account to get started. You can do this through the Obico mobile app or the web app. Here's how:

- 📱 Mobile App: If you're using the mobile app, open it and follow the on-screen prompts to sign up for an Obico account.

- 🌐 Web App: If you prefer to use the web app, open a web browser and go to the Obico Website. Click on the "Sign Up" option and follow the registration process. You can sign up with your email, Google, or Facebook account.
Step 2: Link Your Printer to Obico
To connect your Sovol SV07 Series 3D printer to Obico and unlock its remote access and AI-powered features, follow these steps:
- Visit the Obico Website: Access the Obico Website (or your own Obico server if you have one).
- Sign In: Log in to your Obico account using the credentials you just created. Once logged in, navigate to the "Printers" page on the Obico platform.
Step 3: Select "Klipper" and Connect Your Printer

- Select "Klipper": Click "Link New Printer," and when prompted to choose your printer platform, select "Klipper" and then click “next.”
- Automatic Recognition: At this point, the Obico app should automatically detect your printer if it's on the same local network. If it is recognized, you can simply click the "Link" button in the Obico app to establish the connection between Obico and your printer.
Step 4: Give Your Printer a Custom Name (Optional)
You have the option to provide a custom name for your Sovol SV07 Series 3D printer if you prefer.
Step 5: Explore Your Printer Feed
With the setup complete, you can now enjoy the benefits of real-time monitoring, failure detection, and remote control of your 3D printer through the Obico platform.
By following these steps, you'll have successfully set up Obico for Klipper on your 3D printer, granting you remote access and AI-powered features to enhance your 3D printing experience.
Note: If Auto-Discovery Doesn't Work: Link Your Printer Manually
In case your printer isn't automatically recognized on the Obico website, you can manually link it by following these steps:
- Enter Manual Linking Mode: Return to your terminal and enter 'y' to initiate manual linking mode.
- Switch to Manual Setup: In the Obico app, select "Switch to manual setup instead."
- Retrieve a Six-Digit Code: You'll be provided with a six-digit code.
- Paste the Code: Paste the code into the terminal to manually link your printer.
These steps ensure that even if auto-discovery doesn't work, you can still establish the connection between Obico and your Sovol SV07 Series 3D printer.
What Obico for Klipper Offers
Here, we'll explore the array of features and benefits that Obico for Klipper brings to the table, enhancing your Sovol SV07 Series 3D printing experience.

Full Mainsail/Fluidd Remote Access
Obico for Klipper provides you with complete remote access to your Sovol SV07 Series 3D printer through the Mainsail or Fluidd interface. This means you can control and monitor your printer from anywhere, whether you're in the same room or miles away.
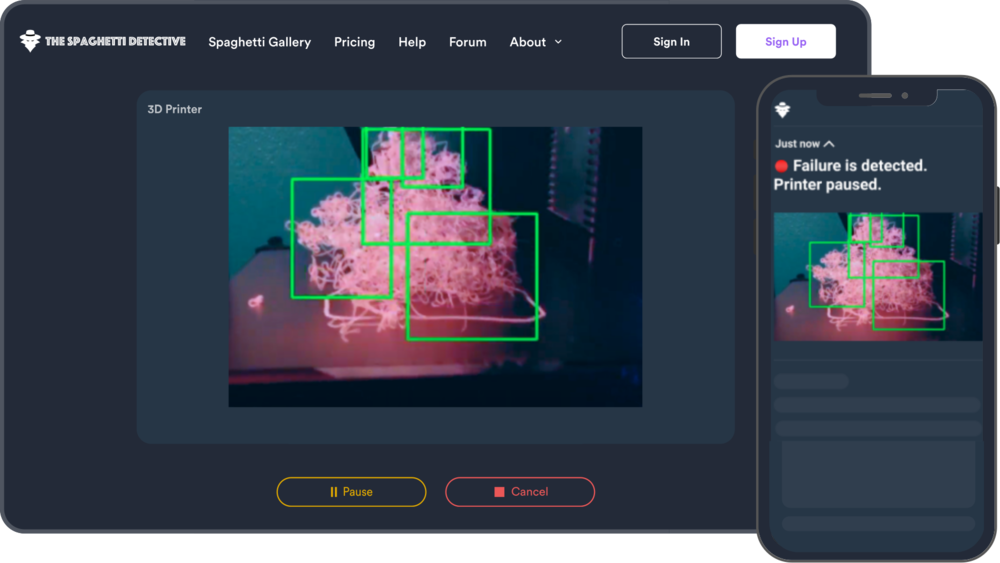
AI Failure Detection
The power of artificial intelligence is at your fingertips. Obico's AI system actively monitors your 3D printing process, detecting potential issues and failures in real-time. It's like having a vigilant assistant that ensures your prints come out flawlessly.

Mobile App for iOS and Android
Obico offers a user-friendly mobile app for both iOS and Android devices. This means you can conveniently manage and keep tabs on your Sovol SV07 Series printer using your smartphone or tablet, making 3D printing more accessible and flexible.

Comprehensive 3D Printer Status Notifications
Stay informed about your print job's progress and your printer's condition. Obico provides detailed status notifications, ensuring you're always up-to-date on your 3D printing projects.
Push Notifications
Receive push notifications directly to your mobile device. Obico keeps you in the loop, alerting you to any changes or important events related to your prints.
Email Alerts
For those who prefer email notifications, Obico has you covered. Get essential updates and alerts sent straight to your inbox, ensuring you never miss a beat when it comes to your 3D printing tasks.
Discord Integration
Obico seamlessly integrates with Discord, a popular communication platform. This integration allows you to receive notifications and updates about your prints through your Discord server, keeping your 3D printing community in the know.
Conclusion
In conclusion, Obico for Klipper is your gateway to elevating your Sovol SV07 Series 3D printing journey. By seamlessly integrating remote access and AI-powered monitoring, Obico enhances not only the convenience but also the precision of your 3D printing endeavors.
With the ability to manage your printer from anywhere, be it through your computer, mobile device, or even Discord, Obico brings 3D printing into the future of convenience. Real-time status notifications, failure detection, and multiple notification channels ensure that you're always in control and well-informed.
As you embark on your 3D printing adventures with the Sovol SV07 Series, Obico for Klipper becomes your trusted companion, making the process more accessible, efficient, and enjoyable. Say goodbye to limitations and hello to the future of 3D printing convenience with Obico.