How To Train a Smart Detective - AKA Behind-The-Scenes Glimpse at Deep Learning in 3D Printing

In the past several months The Detective team has done a lot of experiments to figure out how we can improve the accuracy of the detection algorithm. We have tried tens of different ways. Most of which didn't work - just like any other Deep Learning projects. But more importantly, we learned through those failed experiments why they didn't work, and applied those learnings to the experiments that did work! The end result of those several months of work was 2.5x improvement on the accuracy.
In this article we will give you a behind-the-scenes glimpse on how those crazy Deep Learning technologies are used to catch 3D printing failures.
Readers be aware: very geeky content ahead.
How do we measure accuracy?
First things first - how do we even know we have improved the accuracy by 2.5x? As a matter of fact, how do we know if any of the tens of different experiments we have done managed to improve the accuracy, didn't matter, or actually made things worst (it happens a lot. Trust me.)?
Define "accuracy"
In Deep Learning world, counter-intutitively, "accuracy" is actually not one number. The most commonly used metrics to measure accuracy, which are also what we use in TSD, are:
Precision. In all the print failures The Detective identified, how many of them are real failures.
Recall. In all the failures that actually happened, how many of them were actually caught by The Detective.
F1 score. A measurement that "balances" beteween Precision and Recall. The reason why we want to use F1 score is because neither Precision nor Recall alone can give an unbiased view on how good an alorithm is. For instance, if we want to achieve a very high recall score, we can simply tell The Detective to blindly alert on every single print. Then by definition, we achieve 100% in Recall score, which is as high as it can be. Conversely, if we want to make Precision as high as possible, we can simply send The Detective on vacation and not alert on any of the prints. That's why we primiarily rely on F1 score to meaure the accuracy.
mAP (Mean Average Precision). Precision and Recall are used when we only need to know "if there is any spagehtti on this image". But it's possible, although not very often, that The Detective takes a bundle of wires as spagehtti, while being oblivious about the ball of yarn sitting at the corner of the bed. Hence it is quite useful to know if The Detective is actually looking at the right object when she makes the claim. The measurement for this purpose is call mAP.
For the adventurous minds, you can get more info about Precision and Recall, F1 score, and mAP.
What exactly do we use to measure accuracy in TSD?
The reason why I said "we primarily use F1 score to measure accuracy is because Precion and Recall are not equally important for most TSD users. Most users are ok with some false alarms if that helps them to catch most print failures. This translates to our decision of giving more weights to Recall than Precison.
In the old algorithm, we set the parameters so that Recall was 45% whereas Precision was 21% (4 out of 5 alerts were false alarms - ouch!). That gave us the F1 score as 28%. If we had given equal weights to Recall and Precision, we would have set the parameters so that both Recall and Precision were about 30%. That would have given us a higher F1 score at 30% but it also means The Detective would have missed 70% of the failures - hardly an smart detective by any measure.
How much has the algorithm improved?
After all the progresses (described later) we have made on the algorithm, Recall is now 69% while Precision is 61% (F1 socre = 65%). To translate this to plain English, the new algorithm lets The Detective to catch more than 3 out of every 4 print failures, while sends false alarms less than 50% of the times. She is still not as impressive as Sherlock Holmes but certainly much smarter than before.
Although Precision, Recall, and F1 score are useful for engineers to measure the progress, none of them are particuarly intuitive for a user to understand. That's why we translate them into something more straightforward: how often The Detective gets it wrong. That is, for every 100 prints, how many times would The Detective send a false alarm, or miss a real failures. With the old algorithm, this number was about 23%.
With the new, improved algorithm, this number is now only 6.9%! That's why we say The Detective is now 2.5 times smarter than she used to be. However our ambition is for The Detective to make less than 2% of the mistakes, which would be perceived by most users as 10x better!
How does The Detective detect?
Whew! That's a whole lot just to have a good way to talk about how smart The Detective is. Now it's the time for the real interesting question: How does she detect?
The "brain" of The Detective is a state-of-the-art, real-time Deep Learning algorithm called YOLO. Every time the camera takes a snapshot of the print, the image is sent to TSD backend system, which then run it through the YOLO algorithm.
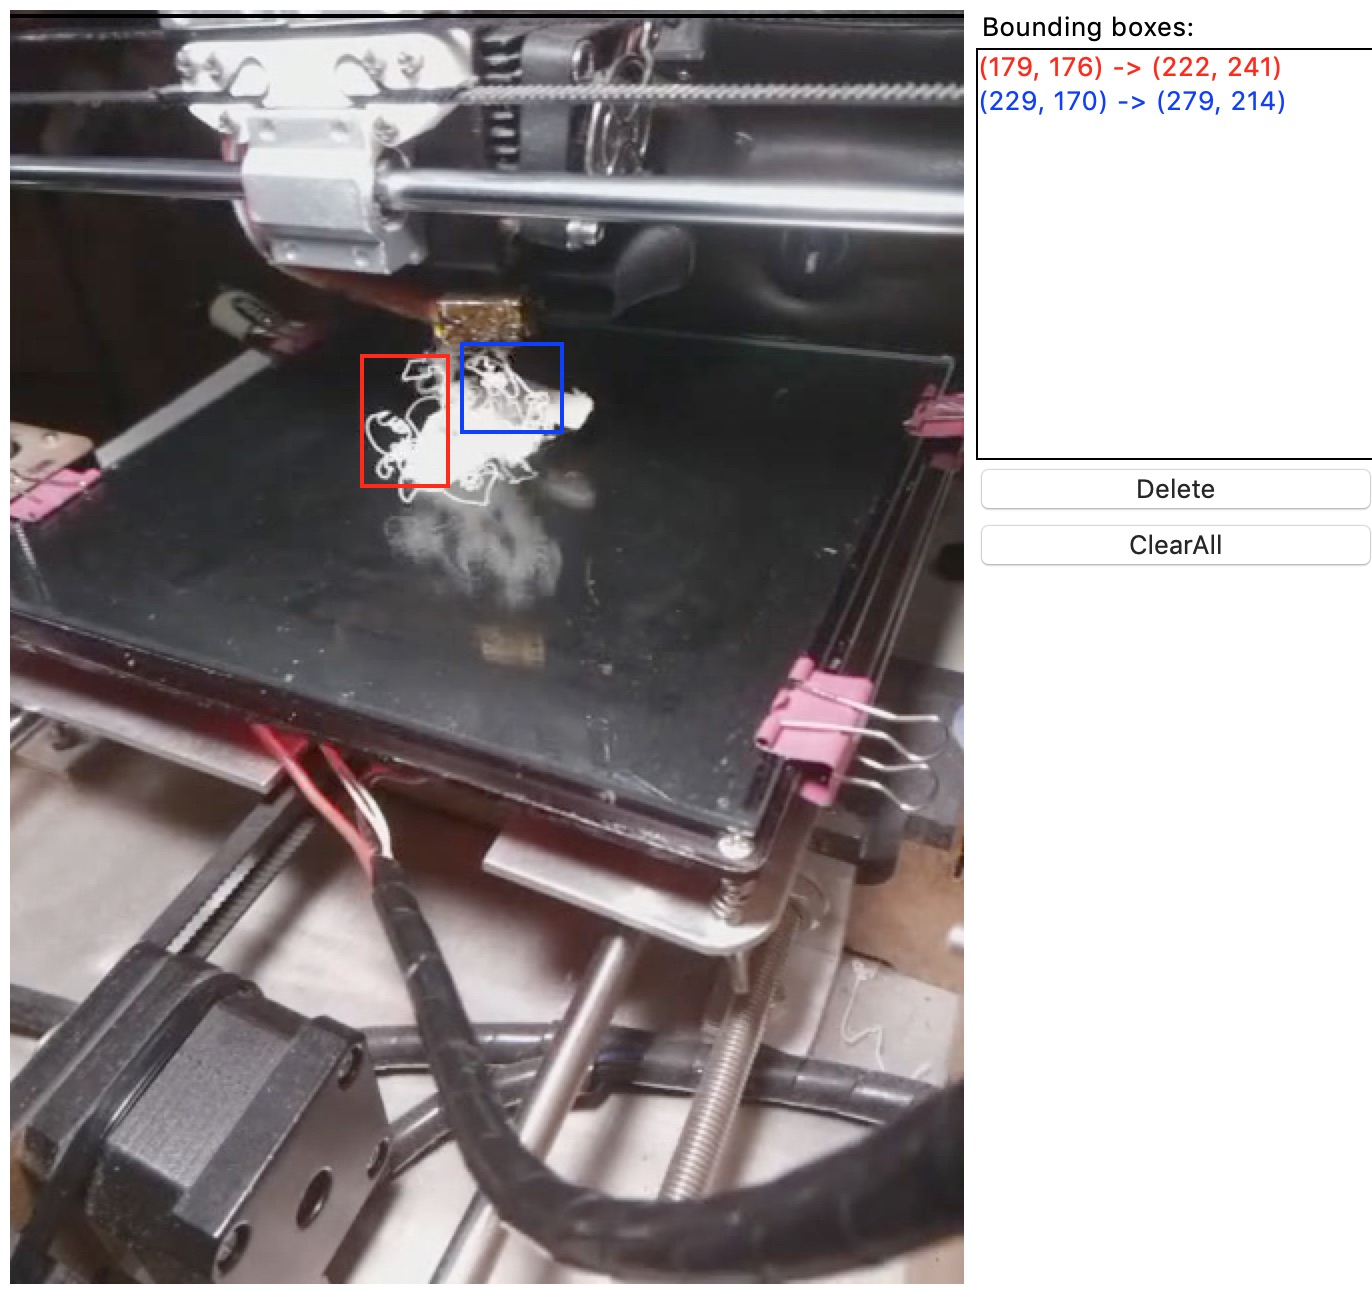
You might think YOLO algorithm would just tell us "hey I found spaghetti in this snapshot!", or "Nope there is nothing interesting there!". The reality (be prepared for some disappointment) is what YOLO can tell us is a lot less dramatic or interesting. After crunching the numbers (in this case, an image), YOLO spits out the coordinates of severval boxes with one number associated to each of these boxes to indicate how likely that box contains some kind of spaghetti. An image is worth a million words here:
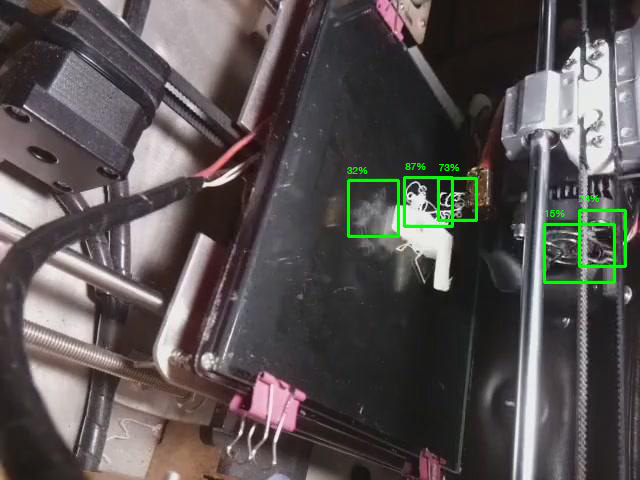
In the example above, YOLO correctly identifies 3 boxes that contain spaghetti, one of them being the reflection on the glass bed. However, it mistook the fan grill as 2 globs of spaghetti. Fortunately it is less certain about the fan grill and attaches low percentages (not always the case) to them.
Train The Detective's brain
Now you know how YOLO works, it probalby wouldn't come as a surprise to know that we are trying to accomplish is to make YOLO spit out boxes with very high percentages (ideally 100%) for images that contain any sort of spaghetti, and do the opposite, i.e., no boxes or few boxes with very low percentage, for images that contain no traces of spaghetti.
This process is called "training the YOLO model". If you are the super adventurous kind and want to try that at home, this blog is an excellent soruce of information. But if you don't want to bear the nitty-gritty details, here is a gist of what goes into training a YOLO model:
Collect a bunch of images that contains spaghetti.
Use some special software to draw boxes on these images around the spagehtti on them. This is called "data labelling" in Deep Learning. The coorindates of these boxes will be saved as "label files".
Put all these images and their "label files" in a folder.
Run a command that invokes YOLO's training function, with the path to images and label files as input parameters. This will officially kick off the training process that will takes hours, or even days to finish even on a really good (expensive) GPU server. Don't do this step on a computer without a GPU as it would take months to finish even on a computer equiped with the best CPU.
This may already sound like a lot of work. The reality was even worse. We had to repeat this process hundreds of times. The reason was that, just as with any other Deep Learning projects, the very first "trained YOLO model" barely worked. It mistook many objects as spaghetti while missing a bunch of real ones. For instance, for some mysterious reason it often mistook the image on Ender 3 bed, or binder clips as spagehtti.
The steps we have to go though after a model is done training are:
Go through thousands of images highlighted with these green boxes that represent what YOLO thinks where the spaghetti are;
Get some rough idea on what kinds of mistakes were the most common;
Come up with some good guesses on why that might have caused these mistakes;
Adjust the images, the labels, or the YOLO training configurations;
Kick off the training process and wait for it to finish;
Rinse and repeat (except each rinse cycle is hours or days).
Believe it or not, most of these cycles resulted in no improvements in accuracy, or quite often, decreased accuracy. Here are some of the things we have tried but didn't work.
Make all images grayscale (black and white)
Since spaghetti are spaghetti no matter what color it is in, it would only make intuitive sense to convert all color images to grayscale ones before using them as the training data. We want to make The Detective as color-blind as she can be, don't we?
After a couple of days of waiting, the newly trained model full of our hope came out, only to shock us with the results! While the The mAP for the model trained with regular color images was 60%, the mAP for the model trained with grayscale images was only 42%. This was one of the biggest accuracy drop among all the experiments we have done.
We still don't know exactly why using grayscale images backfired so much. But we have a few good guesses:
The training images go through image augmentation that randomly alters the colors before they are are used to train YOLO model. This process, as you might have already guessed, is already quiteeffective at preventing YOLO model from "detecting spaghetti only in red filaments, not green ones".
YOLO model was developed to deal with general use cases, such as detecting faces. 99% of these use cases are about color images. So it wouldn't come as a surprise if a lot of optimization has been done to make YOLO particularly good at working with color images.
Reduce the learning rate in YOLO
Learning rate is an important configuration in almost all Deep Learning methods. Our first model was trained with learning_rate=0.001, the default learning rate supplied by YOLO. When we plotted its learning curve, we got something like this:
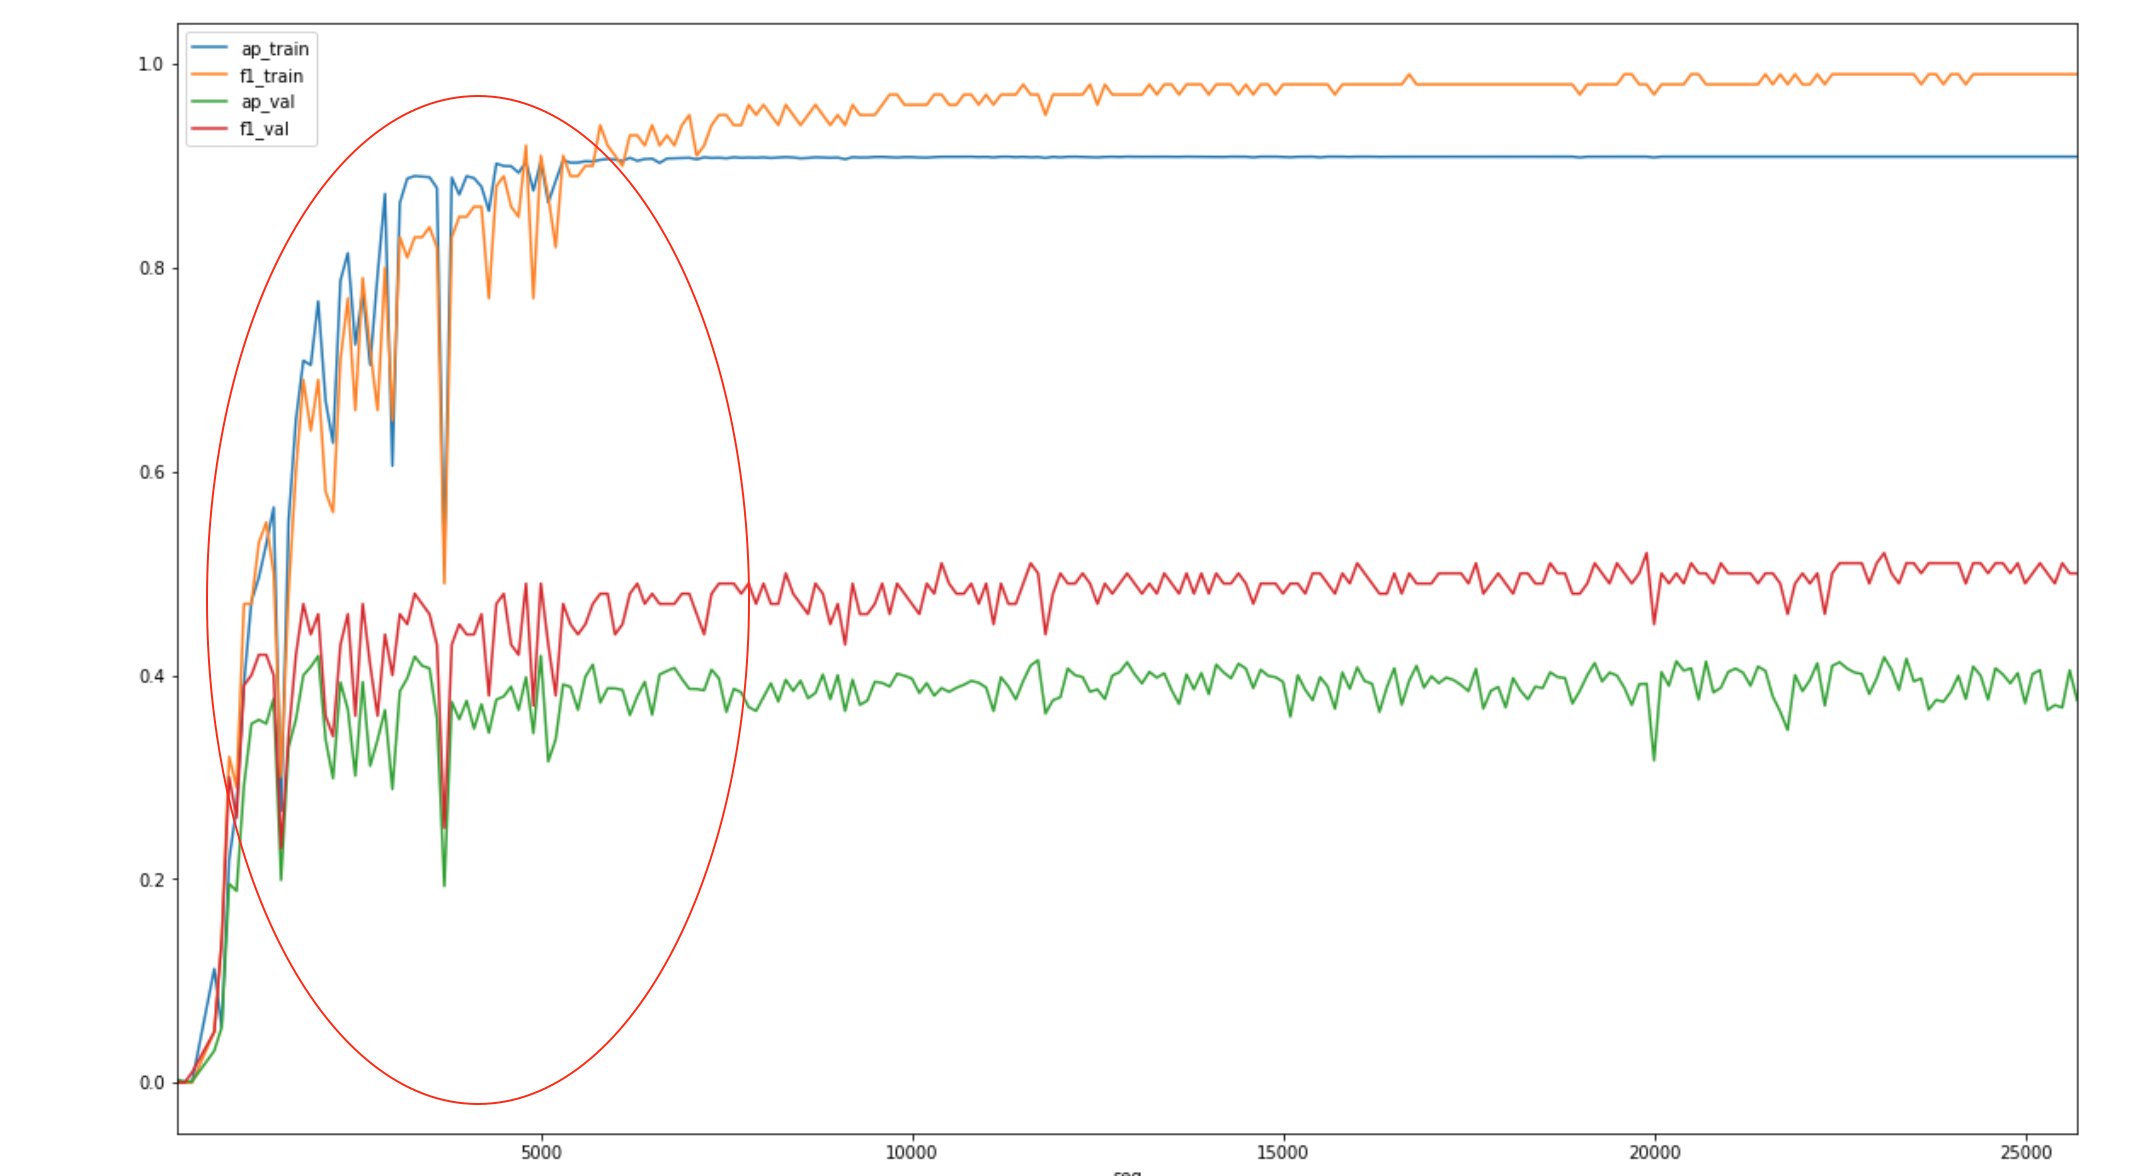
The beginning part of the curve (highlighted) fluctuated a lot, although it stablized eventually. A good guess from this graph is that the learning rate was too high, especially it came as a default value without any tuning.
We did quite a few experiments (read: many days of work) to find out if there is a more optimal learning rate that can help train a better model. The result? The default learning rate (0.001) is actually the optimal one. When we changed it to learning_rate=0.0005 or even learning_rate=0.0001, it took much longer to finish training, and the trained model didn't do better in any of those accuracy measurements. It didn't come as a complete shock, since the default learning rate was probably already super optimized by the creator of YOLO. It was a bit disappointing but hey, to steal from Thomas Edison, "we just found another way that won't work".
From 2.5x to 10x
In this article we have only scratched the surface on what we have tried to make The Detective smarter. In all these experiments that mostly failed to deliver improvements, we did find quite a few ways that worked. For instance, as counter-intuitive as it sounds, we found out that adding negative training samples (images without any spagehtti) actually helped.
By combining all these little improvements from various experiments that worked, we managed to make The Detective 2.5x smarter. This was hardly a failure by any measure. But we don't want to stop here. Our ambition is to make TSD the first and best AI open source project for 3D printing. This means, as I stated earlier, we need to make The Detective at least 10x smarter.
In order to accomplish this ambitious goal, we need help from everyone of you. One of the biggest constraints we have had in the past several months was not having enough time-lapses to feed into the training process. That's why we came up with the idea to "crowd-source" training data for The Detective. The way how it works is easy: you help us identify where The Detective makes mistakes so that we can add them to the training data; and you receive credits in the process that you can later exchange for free months of service after The Detective is good enough to go out of Beta. Check the detailed rules here.